
How can I use the technology in HyFlex Classrooms?
Hyflex Classrooms can be used for both F2F and online classrooms. Following the directions, you can use the HyFlex classrooms effectively.
Step 1: Make Necessary Installations
USB Cables on the lectern are used for sound transmission and image transfer. You need to make the following installations:
- Image Transfer from your computer
- Download the version suited to your operating system from this link.
- After connecting the USB Cable to your computer, image transfer will automatically take place reflecting your computer on the screen.
- Installation of the Microphone
- Install the driver from this link to be able to use the microphone in the HyFlex Classrooms.
*If you have not installed the driver to your laptop/ computer, you will not be able to use the microphone in the HyFlex Classrooms.
The use of camera and microphone in HyFlex Classrooms is only possible when the installation steps above are followed. Should you have trouble whilst installing them, please contact us via Solution Center.
Step 2: Preliminary Preparations
- Go to the Zoom Link for your course on the LMS.
- Sign into your Zoom Account with your Özyeğin University account.
- Make sure that your computer is connected to the “Eduroam” network.
Step 3: The Activation of the Microphone
- AB3: 133 - 134 - 135 - 136 - 235 - 236 - 330 - 347 – 348
- Connect the cable labelled “Zoom” on the lectern to the USB Port on your laptop.
- To select the microphone, click on the cursor over “the microphone on/off control section”.
- Select “Steinberg UR22C” in the “Select a Microphone” section.
- After the completion of the first installation, this selection will be done automatically. Still, it may be a good idea to check if this is selected whilst connecting.
- AB2: G01 - G02 - G03 - 103; SCOLA: 126 - 127 - 229 - 322 – 323
- To select the microphone, click on the cursor over “the microphone on/off control section”.
- Select “MG-XU” in the “Select a Microphone” section.
- After the completion of the first installation, this selection will be done automatically. Still, it may be a good idea to check if this is selected whilst connecting.
Step 4: Sound Activation for Zoom Participants
- To select the microphone, click on the cursor over “the microphone on/off control section”.
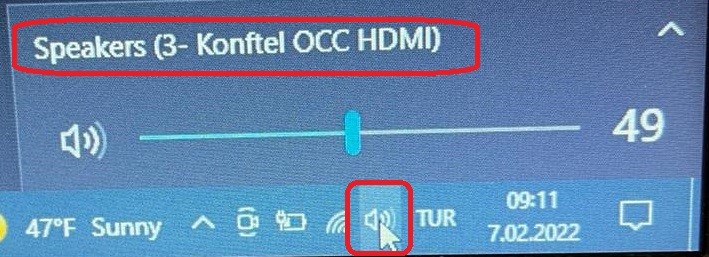
- Select “Konftell-OCC” in the “Select a Speaker” section.

Important Reminder: Your computer will automatically perceive Konftell-OCC as the speaker after connecting the USB Cable. Still, it may be a good idea to check if this part is selected when there is no sound.
Step 5: Camera Activation
- Click on the cursor over the “video on/off control button” on the Zoom screen.
- Select “Aver 310” in the “Select a Camera” Section.
- After the first installation, the camera will be recognized automatically. Still, it may be a good idea to check if this is selected.
- The camera will be working in Hybrid Mode following you during the lesson focusing on the board as you use it.
Important Reminder: The application you have installed previously for the camera pre-set settings will not be used. The previous application, when connected with your camera, will disable the camera from working in a Hybrid mode.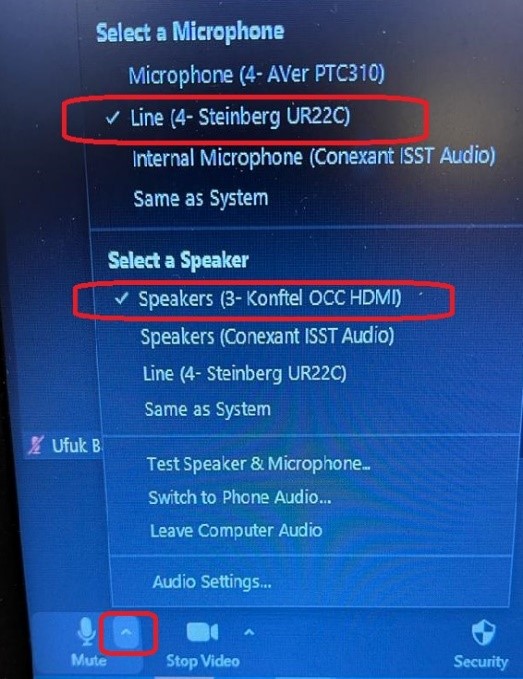
*For any problem that may arise, you may contact our audio & visual team at 0216 564 90 00 either using the landline on the lectern or your mobile phone.
![]() Our Hyflex Classrooms:
Our Hyflex Classrooms:
AB3: 133 - 134 - 135- 136 - 235 - 236 - 330 - 347 - 348 - 237 - 238 - 241 - 331 - 332 - 338
AB2: G01 - G02 - G03 - 103 - 101 - 102
AB4: B228 SCOLA: 126 - 127 - 229 - 322 - 323
Oditoryum: AB1 - 410 - AB3 - 150
Altunizade: 102 - 101
SwissOtel: 104
- Log in to post comments