
How do I use Zoom on exam? (Courses with a class size of more than 25)
With the "Gallery View" feature, only 25 students can be proctored at the same time on the Zoom application. If the class size is more than 25 people, you need to create "Breakout Rooms". In this document, it has been assumed that the class size is more than 25 people.
In order to provide a safer and healthier exam process and see whether the settings you have chosen give the desired result, it is recommended that you do a “Practice Test” with a colleague before the exam.
Remember to download and install the Zoom application before the exam by accessing https://zoom.us/download. Register to Zoom application with your Özyeğin account.
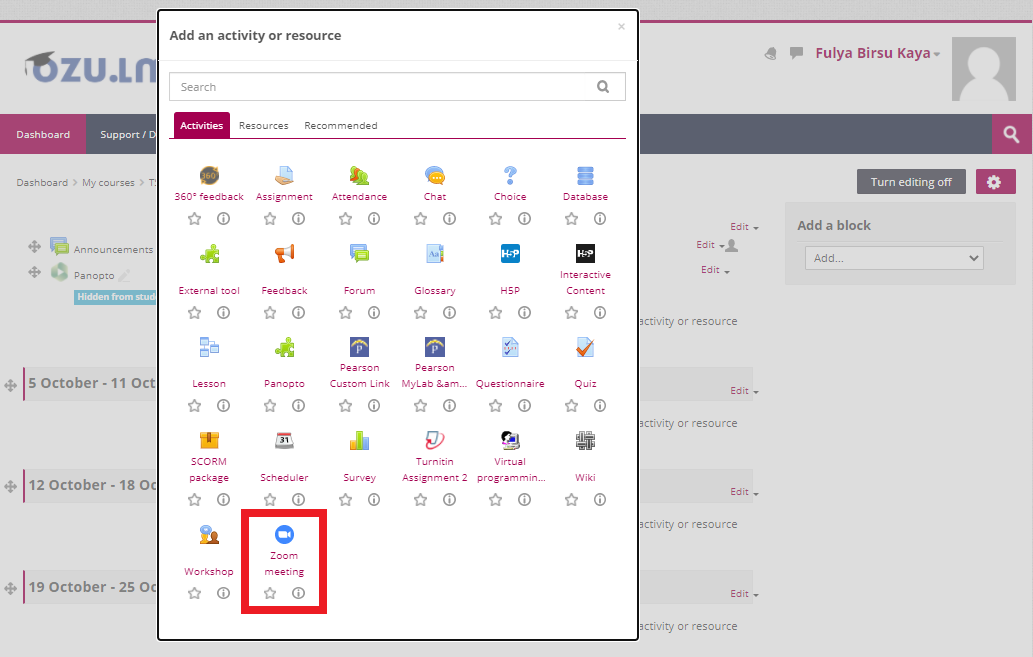
- Create a “Zoom Meeting” on the LMS.
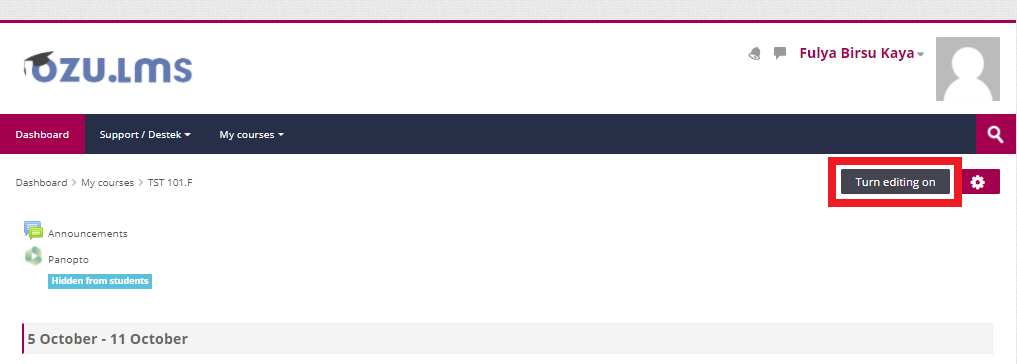
- Access to the related course on the LMS and click on the "Turn Editing On" button.
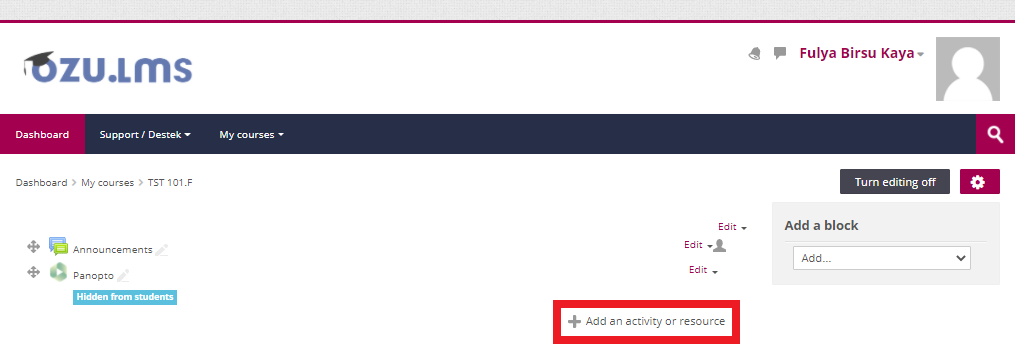
- Click on the “Add an Activity or Resource” field.
- Click on the “Zoom Meeting” option.
- If necessary, you can secure the exam with a password protection.

- If the exam is to be administered by another proctor, enter the e-mail addresses of the proctor(s) in the "Alternative Hosts" section when creating the Zoom Meeting. (If proctors have licensed Zoom accounts, they can be defined in the "Alternative Hosts" field before the exam. If they do not have licensed Zoom accounts, they can be defined as a Co-Host during the exam or proctors may request the license by contacting Solution Center before the exam.)

- Access to the related course on the LMS and click on the "Turn Editing On" button.
- Be sure to give the proctor a list of students.
- One proctor will be needed for every 25 students. Before the exam, you can divide the number of students to take the exam by 25 and you can find how many proctors will be needed. If the result is a decimal number; for example, if the result is 4.3, you will need 5 proctors with you. It is important to determine the number of proctors needed and to make the necessary organization and information before the exam.
Class size / 25 = Number of Proctors = Number of Breakout Rooms to be Created
- Make sure to leave at least 15 minutes of preparation time before the exam.
- Start Zoom Meeting.
- Check the authorizations of all proctors, if necessary, assign them Co-Host authorization.
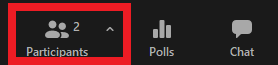
- Click on the "Participants" option in the Zoom toolbar.
- The list of participants will appear on the page that opens.
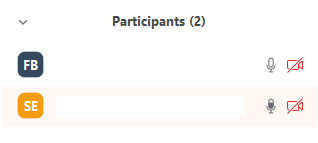
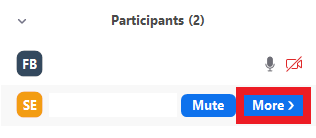
- Hover over the participant for whom you will assign the "Co-Host" authorization and click on the "More" button.
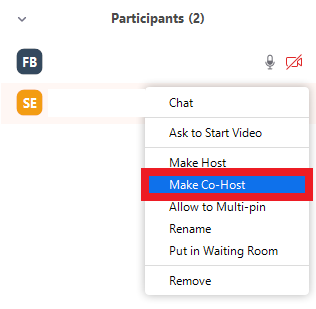
- Click on the “Make Co-Host” option.
- Click on the "Participants" option in the Zoom toolbar.
- Announce to students about the rules and start-end time of the exam.
- You can use one of the two methods below to prevent students from sharing their screens with each other.
- Click on the "Security" option in the Zoom toolbar and make sure that the "Share Screen" feature is not active.

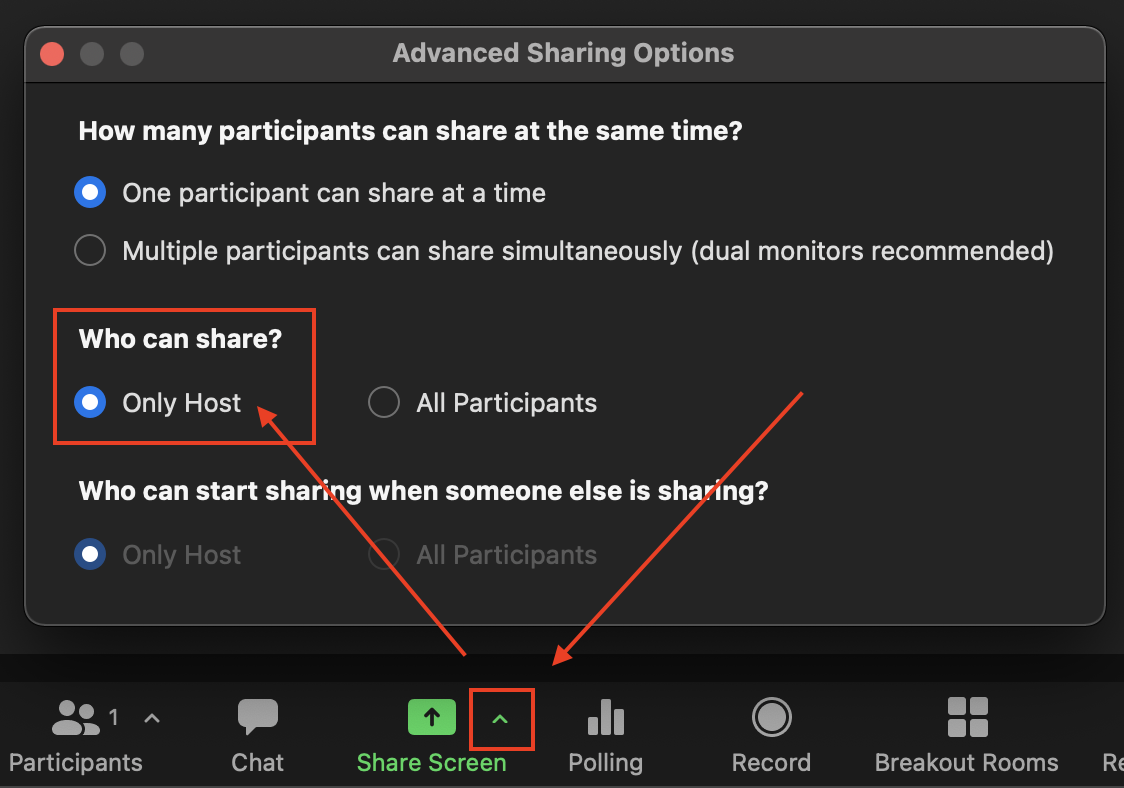
- Click the inverted lowercase v next to the “Share Screen” option in the Zoom toolbar, then click the “Advanced Sharing Options” option. “Who can share?” You can select “Only Host” under the heading.
- Click on the "Security" option in the Zoom toolbar and make sure that the "Share Screen" feature is not active.
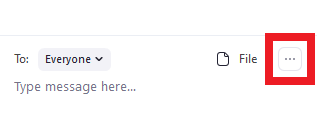
- Disable the Chat feature.
- Click on the "Chat" option in the Zoom toolbar.

- Click on the "..." sign in the Chat panel.
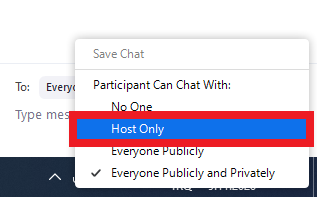
- In the screen that opens, select the "Host only" option to prevent the participants from talking among themselves during the meeting.
- Click on the "Chat" option in the Zoom toolbar.
- Ask students to turn off the virtual background and turn on the microphone, camera, and speaker.
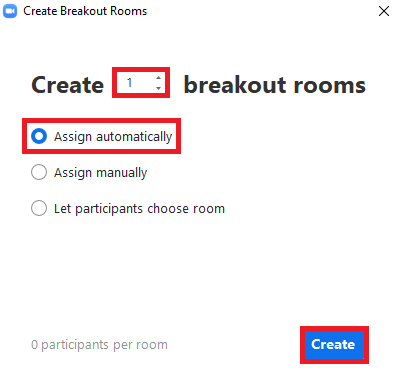
- Create "Breakout Rooms" according to the number of proctors you determined. To do this, click on the "Breakout Rooms" option in the Zoom toolbar.

- Input the number of breakout rooms you want to create. Click on the "Assign automatically" option and then click on the "Create" button.
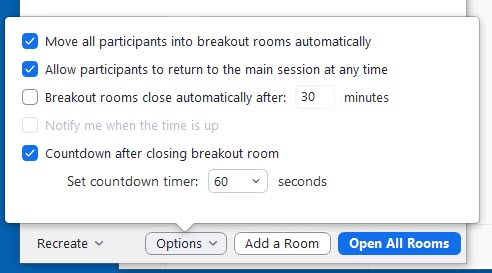
- If "Allow participants to return to the main session at any time" (Allow participants to return to the main session at any time) is removed from the "Options" section, students cannot return to the main session from the meeting control tab. Proctors who are Co-Hosts and instructors who are Hosts can navigate between rooms.
- Click on the “Open All Rooms” option.

- Since participants are assigned to the rooms automatically, more than one proctor can come to the same room, and some rooms may not have a proctor. Proctors should make their checks in the room and move from the rooms with too much proctors to the non-proctors rooms.
- Make sure students' microphones and cameras are working properly.
- Require all students to turn on their cameras and keep them open throughout the exam. Inform students that they cannot leave the Zoom Meeting or turn off their cameras until they submit the exam.
- Say in turn the names of the students. Ask the named student to turn on his microphone firstly and say "here" (so her/his view will be full screen). Then ask them to hold their ID card in the camera.
- After checking the list, ask if everybody's name has been read.
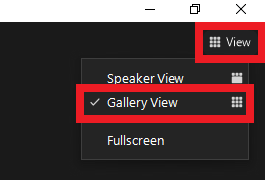
- Select "Gallery View" to view the images of all students at the same time. Thus, you will be able to see images of all students on the same screen.
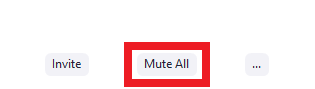
- Mute all participants with the "Mute All" option (You can control the students by doing "Unmute All" at random intervals if you want).

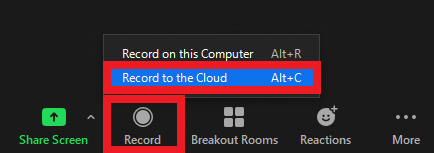
- If you prefer to record the exam, inform the students in advance that the exam will be recorded and select the "Cloud Recording" or “this Computer” option to start recording. In breakout rooms, "Cloud Recording" is not applicable “this computer” option should be used to record rooms.
- Start officially the exam.
- Wish the students good luck and mute your microphone.
- Remind the time 15 minutes before the exam ends.
- Give students 10 minutes to submit their exams (optional).
- Ask the students who have completed the exam to notify with "Raise hand".
- End the Zoom recording and then the Zoom meeting.
- When the exam is completed, the exam recordings may be saved in your local computer or automatically transferred to your "Meeting Recording" folder in Panopto after a while according to your preferences.
- In case of any suspicion of cheating, you can examine the recordings.
If you want students and proctors to be assigned to the rooms beforehand, you can follow the steps below.
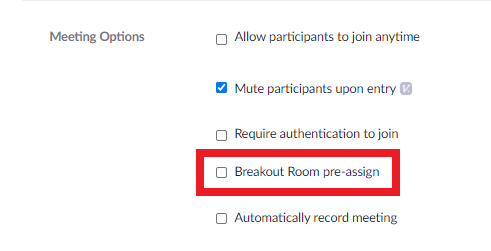
- Create "Breakout Rooms" from the Zoom Meeting settings (If the class size is more than 25 people).
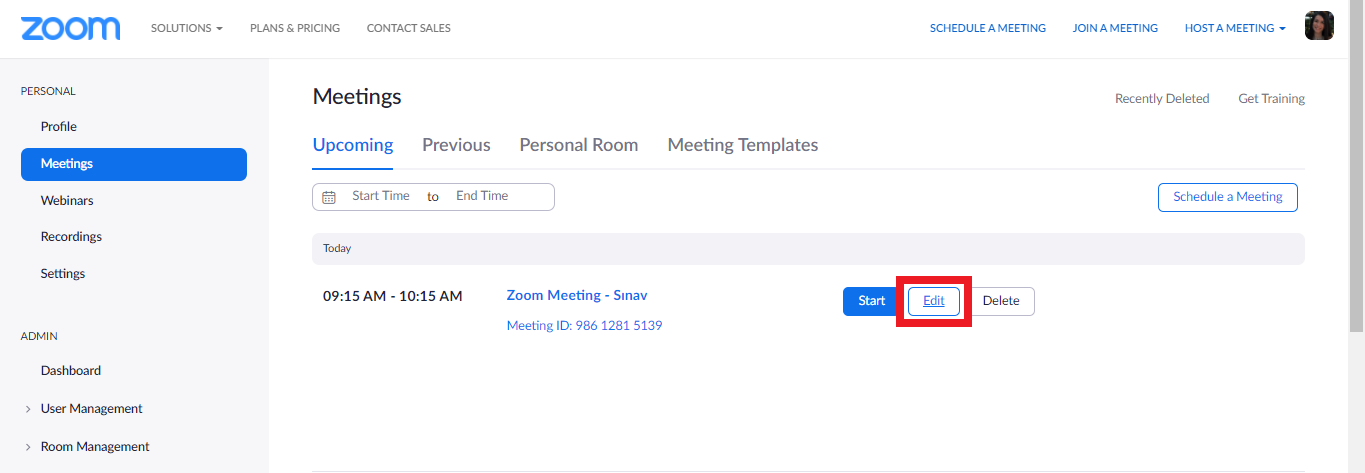
- Sign in to your Zoom account via Zoom.us with the "Sign in with Google" option. Hover the meeting you want to create a breakout room and click on the "Edit" button.
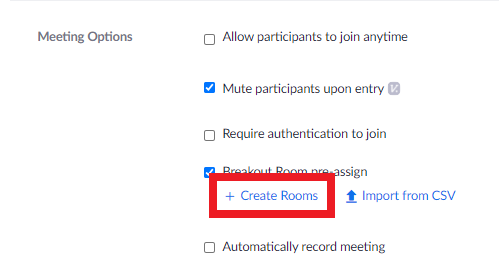
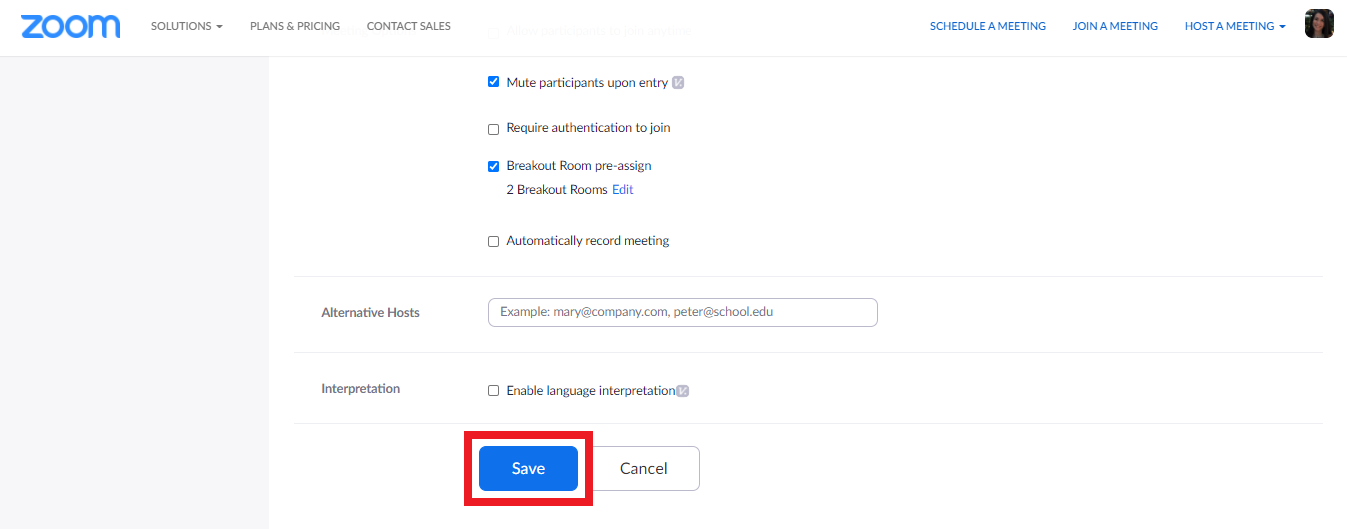
- Click on the "Breakout Room pre-assign" option to activate it.
- Click on the “Create Rooms” field.
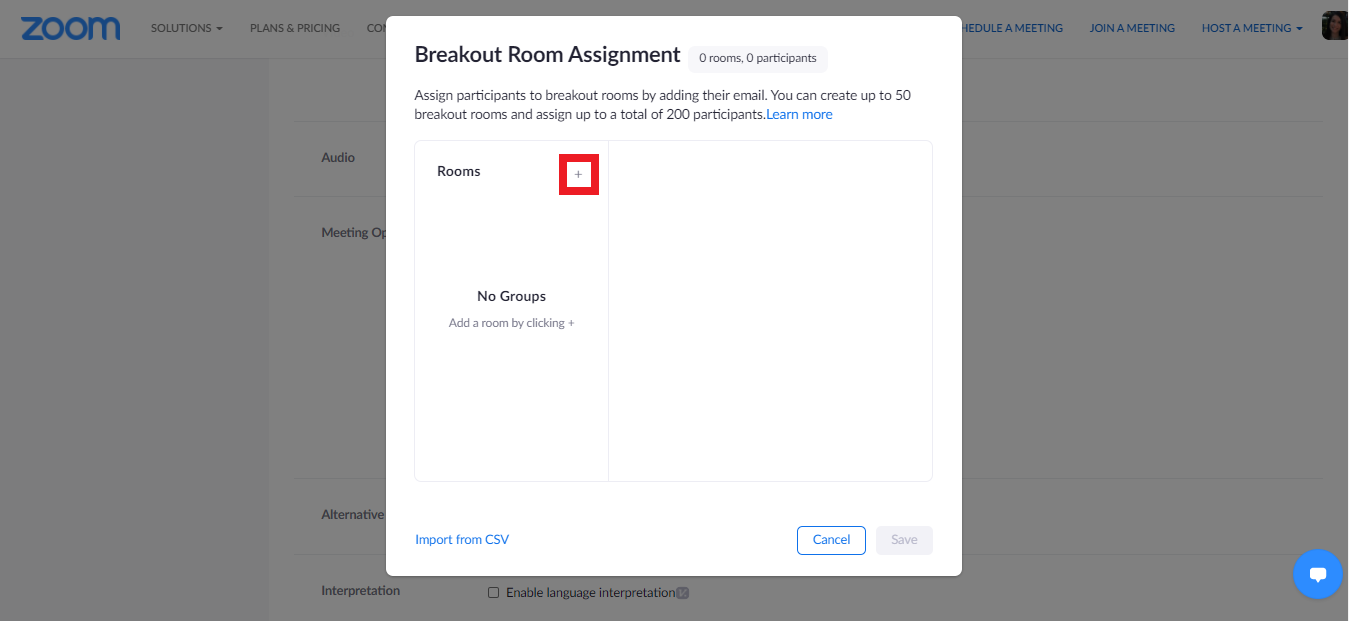
- Click on the "+" icon on the right of the Rooms field on the screen that opens. You can create as many rooms as you want by clicking this icon.
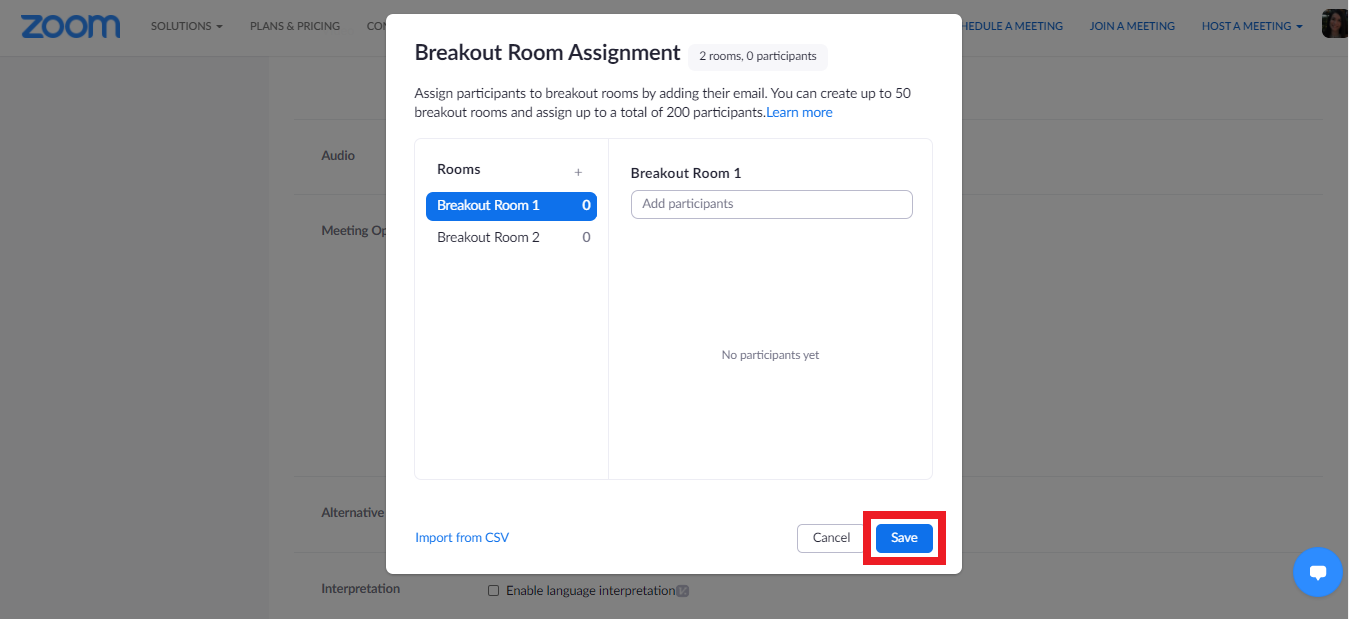
- Click on the “Save” button.
- Click on the “Save” button again.
- Sign in to your Zoom account via Zoom.us with the "Sign in with Google" option. Hover the meeting you want to create a breakout room and click on the "Edit" button.
- Log in to post comments