
How can I prepare an interactive learning material using the LMS's H5P plug-in? (Advanced Level)
You can add various types of questions such as summary statements, single choice set, multiple choice, true/false, fill in the blanks, drag and drop, mark the words, drag text, crossroads and navigation hotspot to make your video interactive.
It is recommended to use the question adding features of H5P in order to increase the learner-content interaction and to prepare instructional materials suitable for the individual learner rather than measurement and evaluation
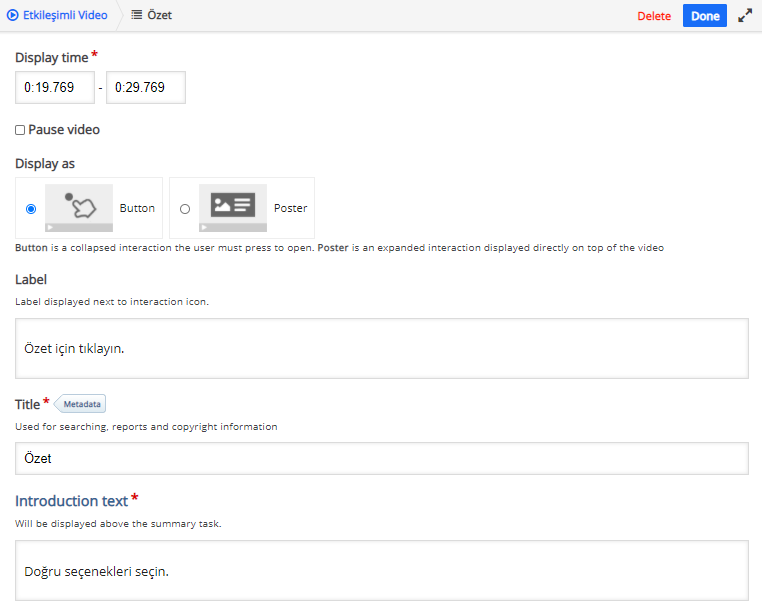
When you click on the "Statements" button to add statements summarizing the lesson, a screen with a range of options will appear. Thus, you can provide the student with a range of summary statements and ask them to choose the correct summary statement among them.
- Firstly, let's get to know the view options.
a. Display time: Determine the time interval you want the summary statements to appear on the screen and input the time period you specified here.
b. Pause video: It enables to pause the video when the summary statements appear on the screen.
c. Display as: It enables summary statements to appear on the screen as a poster or button.
d. Label: Input text for the label. The label is the text that appears next to the interaction icon. When you click on the label, the content will show.
e. Title: Input a title for summary statements.
f. Introduction text: Input the instruction.
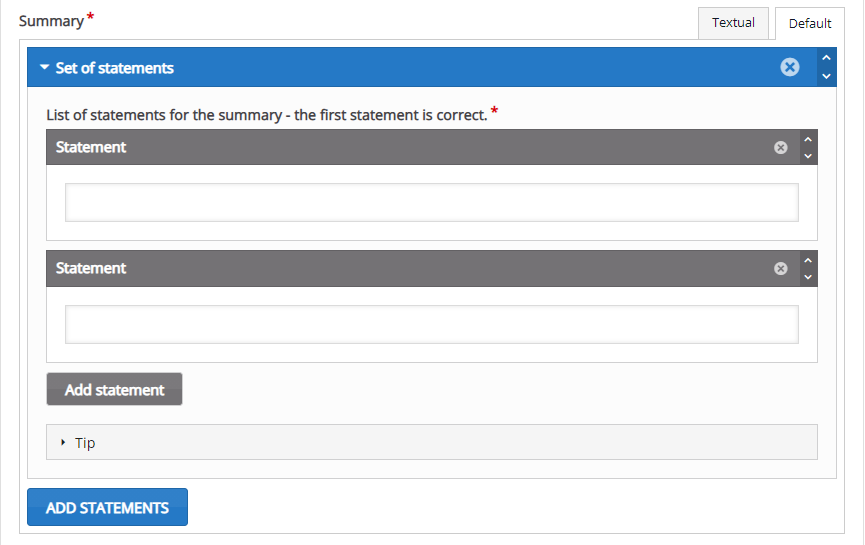
- Let's get to know the options for summary statements.
a. Summary statements should be written in the "Statement" fields under the "Set of statements" tab. The correct summary statement should be written under the "List of statements for the summary - the first statement is correct" field.
b. You can see more options by clicking on the "Add Statement" button.
c. You can create multiple summary questions by clicking on the "Add Statements" button.
d. Click on the "Tip" tab to add a tip and input the tip in the "Tip text" field.
- Let's get to know the feedback options.
a. You can create a custom feedback for any score range you define.
b. Click on the "Add Range" button to add a range. Input your feedback in the "Fill in the feedback" field for each interval you create.
c. Click on the "x" button next to it to delete a range you have created.
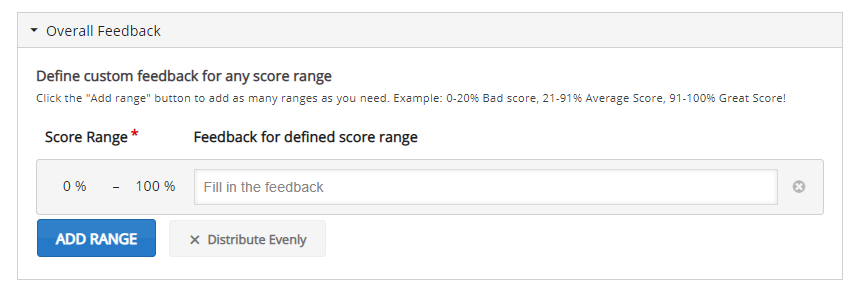
d. Click on the "Done" button after completing the edits.
When you click on the "Single Choice Set" button to add a multiple choice question with only one correct answer, a screen with a range of options will appear.
- Firstly, let's get to know the view options.
a. Display time: Determine the time interval you want the question to appear on the screen and input the time period you specified here.
b. Pause video: It enables to pause the video when the question appears on the screen.
c. Display as: It enables the question to appear on the screen as a poster or button.
d. Label: Input text for the label. The label is the text that appears next to the interaction icon. When you click on the label, the question will show.
e. Title: Input a title for the question.

- Let's get to know the question options.
a. Input your question in the "Question" field under the "Question & alternatives" title.
b. Input options in the "Alternative" fields. Remember to input the correct answer in the "Alternatives - first alternative is the correct one. *" field.
c. Click on the "Add answer" button to add a new option.
d. Click on the “Add question” button to add a new question.
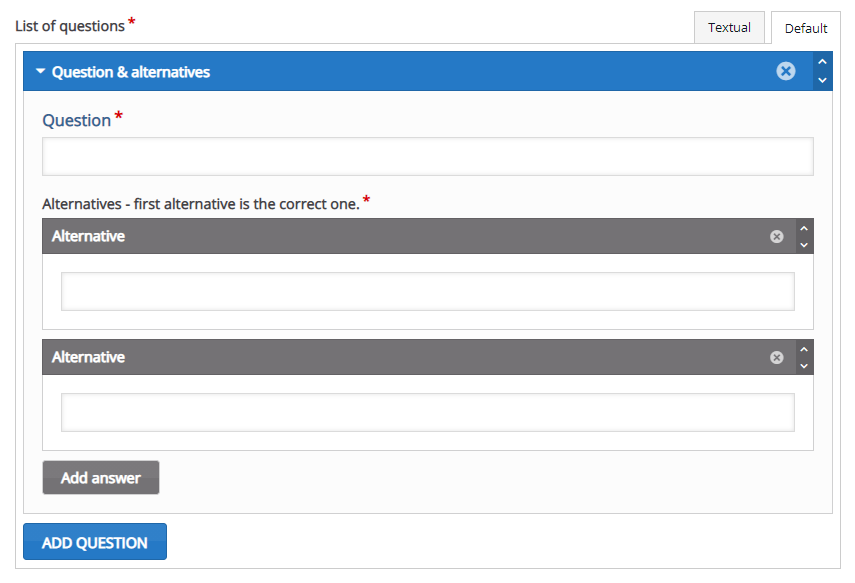
e. Click on the "Done" button after completing the edits.
When you click on the "Multiple Choice" button to add multiple choice questions with more than one correct answer, a screen with a range of options will appear.
- Firstly, let's get to know the view options.
a. Display time: Determine the time interval you want the question to appear on the screen and input the time period you specified here.
b. Pause video: It enables to pause the video when the question appears on the screen.
c. Display as: It enables the question to appear on the screen as a poster or button.
d. Label: Input text for the label. The label is the text that appears next to the interaction icon. When you click on the label, the question will show.
e. Title: Input a title for the question.

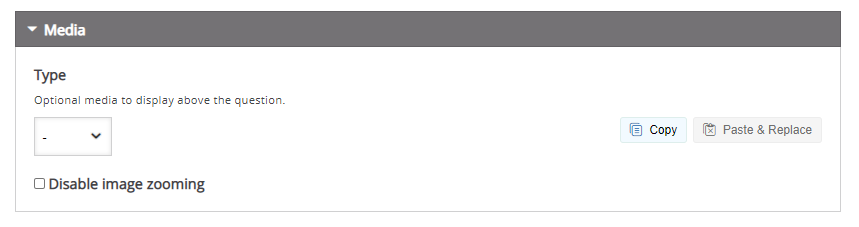
- Let's get to know the media options.
a. When you click on the "Media" tab, an area where you can add images or videos to your question opens.
b. Click on the field under the Type title. You can add a media by selecting the image or the video option.
c. You can disable zooming on the image you add by activating the "Disable image zooming" option.

- Let's get to know the question options.
a. Input your question in the "Question" field.
b. Input the options in the "Text" fields under the "Option" options.
c. Enable the "Correct" option for the correct answer.
d. Click on the "Add option" button to add a new option.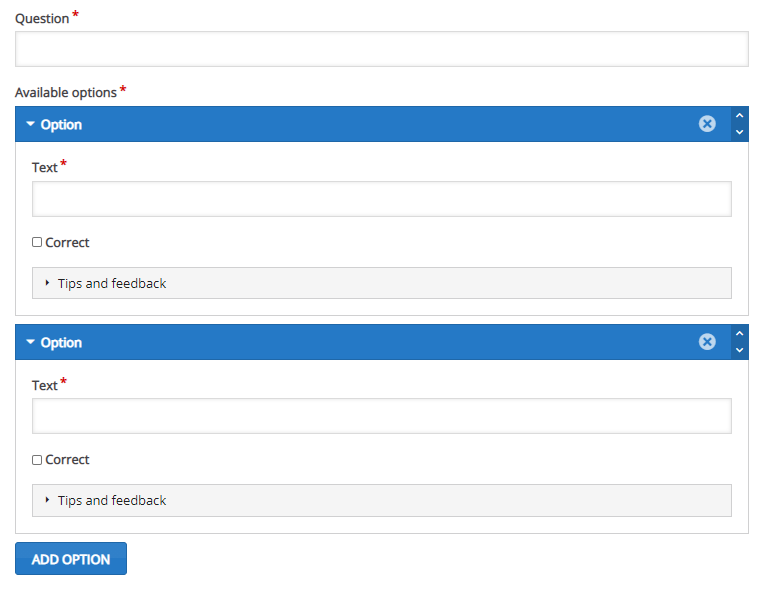
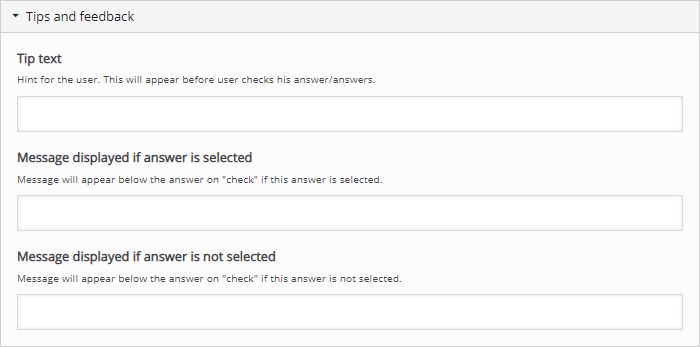
- Let's get to know the tips and feedback options.
a. Tip text: You can create a different feedback for each answer. For this, click on the "Tips and feedback" field under the relevant answer and input the tip in the "Tip text" field. The hint will appear before the students send their answers.
b. Message displayed if answer is selected: If this option is chosen by the student, the feedback you inputted here will appear.
c. Message displayed if answer is not selected: If this option is not selected by the student, the feedback you inputted here will appear.
d. Click on the "Done" button after completing the edits.
When you click on the "True/False Question" button to add a true/false question, a screen with a range of options will appear.
- Firstly, let's get to know the view options.
a. Display time: Determine the time interval you want the question to appear on the screen and input the time period you specified here.
b. Pause video: It enables to pause the video when the question appears on the screen.
c. Display as: It enables the question to appear on the screen as a poster or button.
d. Label: Input text for the label. The label is the text that appears next to the interaction icon. When you click on the label, the question will show.
e. Title: Input a title for the question.

- Let's get to know the media options.
a. When you click on the "Media" tab, an area where you can add images or videos to your question opens.
b. Click on the field under the Type title. You can add a media by selecting the image or video option.
c. You can disable zooming on the image you add by activating the "Disable image zooming" options.
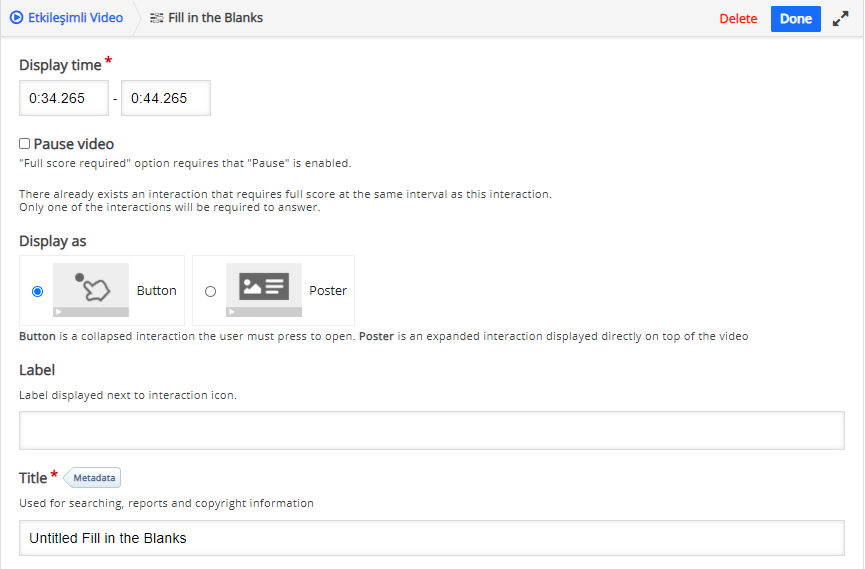
When you click on the "Fill in the Blanks" button to add a fill in the blanks question, a screen with a range of options will appear.
- Firstly, let's get to know the view options.
a. Display time: Determine the time interval you want the question to appear on the screen and input the time period you specified here.
b. Pause video: It enables to pause the video when the question appears on the screen.
c. Display as: It enables the question to appear on the screen as a poster or button.
d. Label: Input text for the label. The label is the text that appears next to the interaction icon. When you click on the label, the question will show.
e. Title: Input a title for the question.
- Let's get to know the media options.
a. When you click on the "Media" tab, an area where you can add images or videos to your question opens.
b. Click on the field under the Type title. You can add a media by selecting the image or video option.
c. You can disable zooming on the image you add by activating the "Disable image zooming" option.

- Let's get to know the question options.
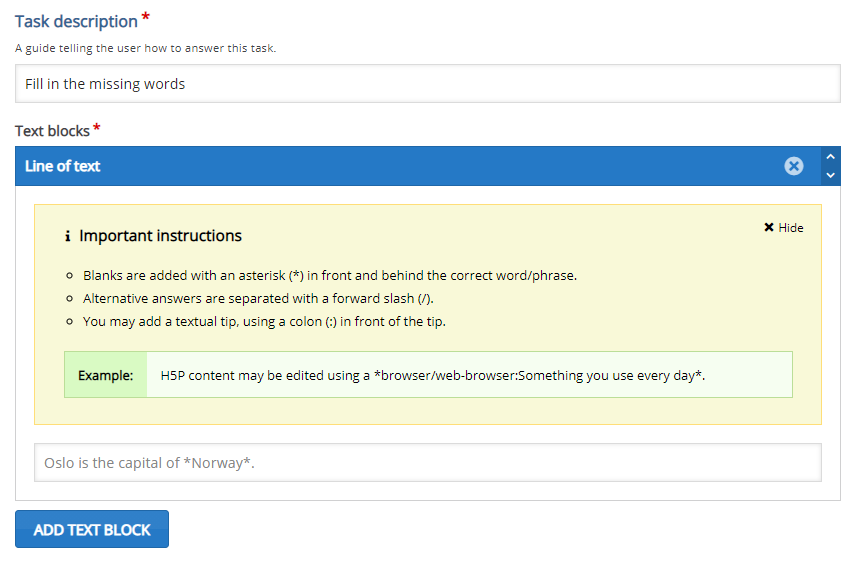
a. Explain how the student should solve the task in the "Task description" field.
b. Input the question sentence in the "Oslo is the capital of *Norway*." field.
c. Blanks are added with an asterisk “*” just before and after the correct word/phrase.
d. Alternative answers are separated with a forward slash “/”.
e. You may add a textual tip, using a colon ":" just before the tip.
f. Click on the "Add Text Block" button to add a new question.
g. Click on the "Done" button after completing the edits.
When you click on the "Drag and Drop" button to add a drag and drop question, a screen with a range of options will appear. There are four different options for creating a drag and drop question. These are text-text matching, text-image matching, text-background matching, and image-background matching.
An example of text-background matching is given in this guide.
- Firstly, let's get to know the view options.
a. Display time: Determine the time interval you want the question to appear on the screen and input the time period you specified here.
b. Pause video: It enables to pause the video when the question appears on the screen.
c. Display as: It enables the question to appear on the screen as a poster or button.
d. Label: Input text for the label. The label is the text that appears next to the interaction icon. When you click on the label, the question will appear.
e. Title: Input a title for the question.

- Let's get to know the question options.
a. Adding an Image
i. Click on the "Add" button to add an image. If you want to create a text-text or text-image matching question, don't add a background image and click on the "Next Step Task" button directly.
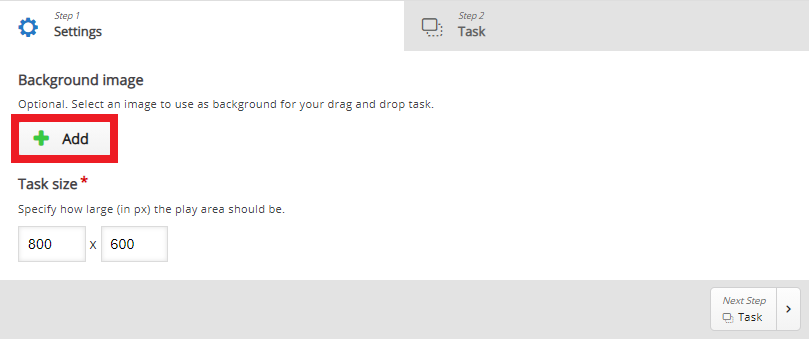
ii. Click on the “Next Step Task” button.

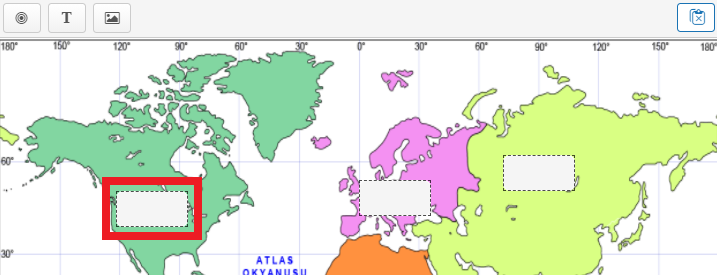
b. Adding a drop zone (In a drag-and-drop question, the drop zone is where the option is dragged and dropped.)
i. Click on the “Drop Zone” icon.
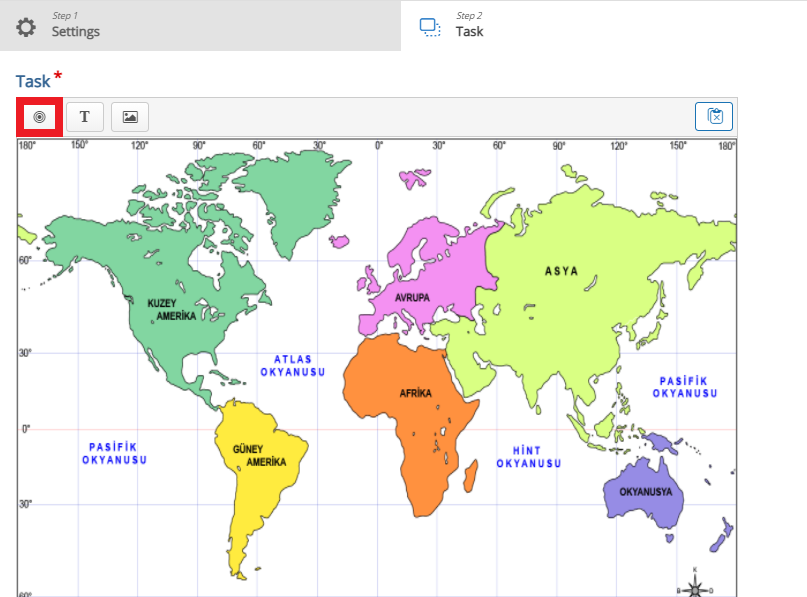
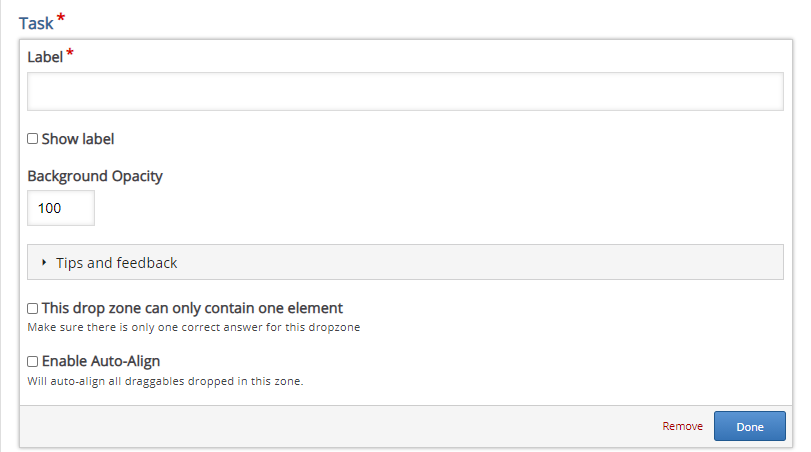
ii. Let’s get to know the drop zone options.- Label: Create a label for the drop zone. You can give the label you created the name of the option you will drag to the drop zone.
- Show Label: If you want the label you defined for the drop zone to appear in the video, click on the "Show Label" checkbox.
- Background Opacity: You can adjust the transparency rate of the drop zone in the video.
- This drop zone can only contain one element: Only one answer can be dragged into a drop zone. Multiple answers cannot be dragged into a drop zone.
- Enable Auto-Align: The content dragged into the drop zone is automatically aligned to the drop zone.
- Click on the "Done" button after completing the edits.
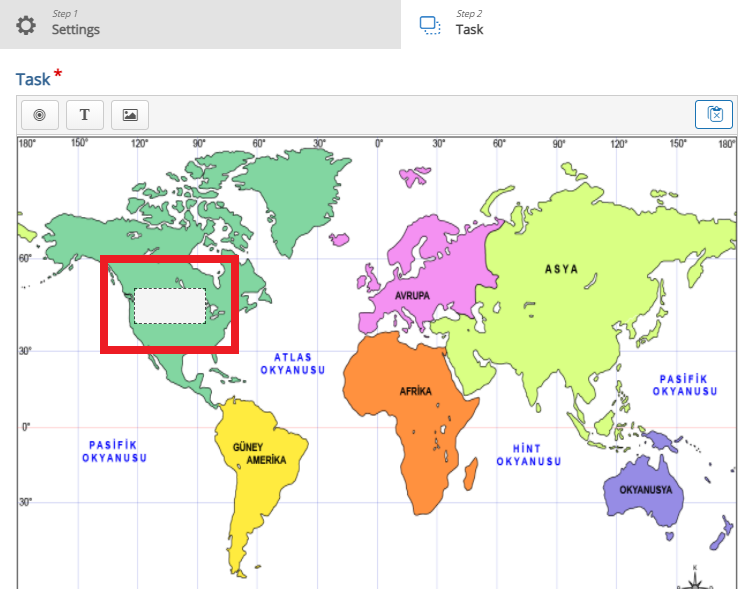
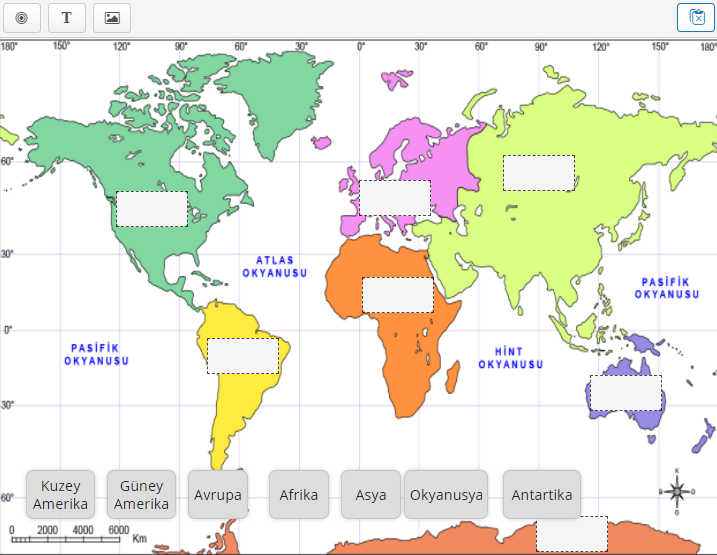
iii. The drop zone you added will appear in the video as below. Drag-and-drop the drop zone to the relevant area on the map.
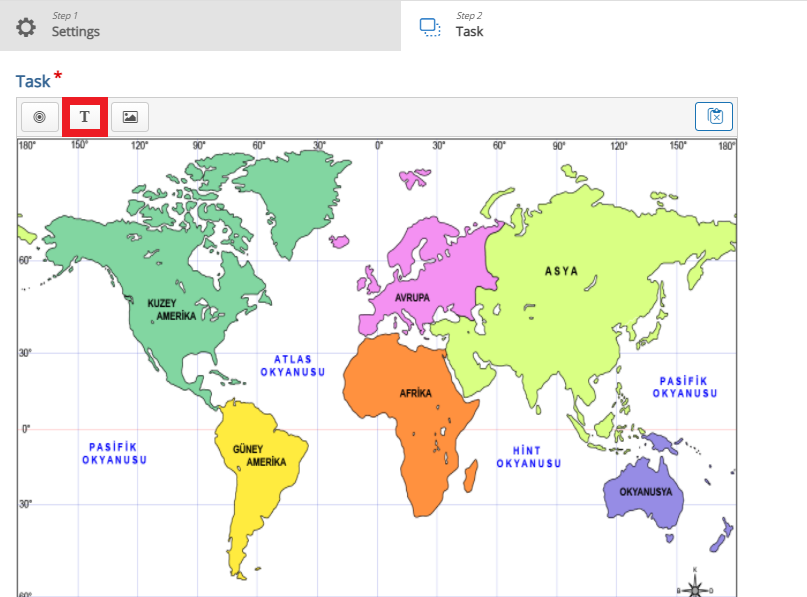
iv. When you add all the drop zones, an image will be created as below.

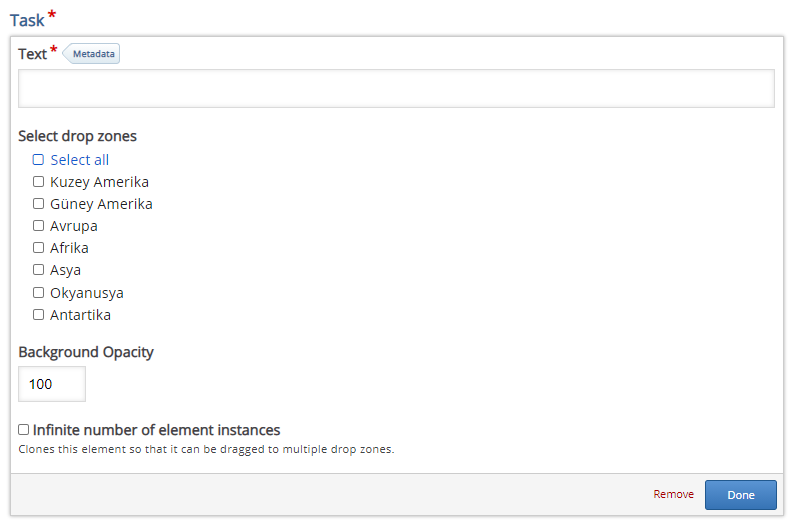
c. Adding Text
i. Click on the “Text” icon.
ii. In the "Text" field, give the name of the option you will drag to the drop zone. Click on the "Select all" checkbox. You can adjust the transparency of the drop zone in the video from the "Background Opacity" field. Click on the "Done" button after completing the edit.
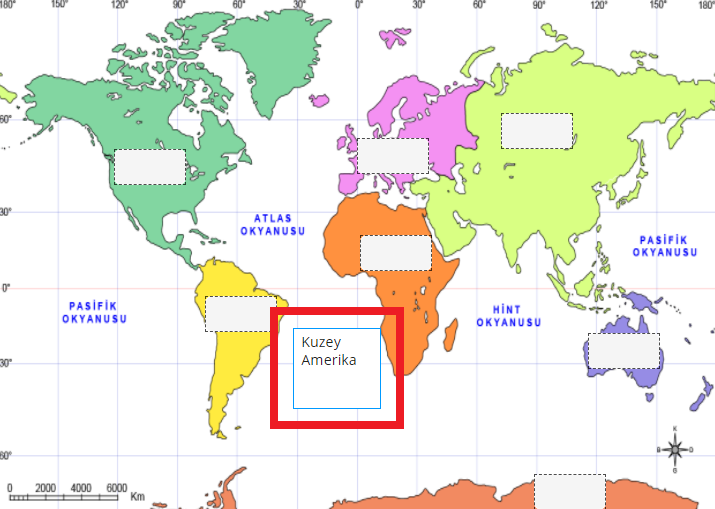
iii. The text you added will appear on the screen as below. You can position it as you want on the page.
iv. When you add all the texts, an image will be created as the below.
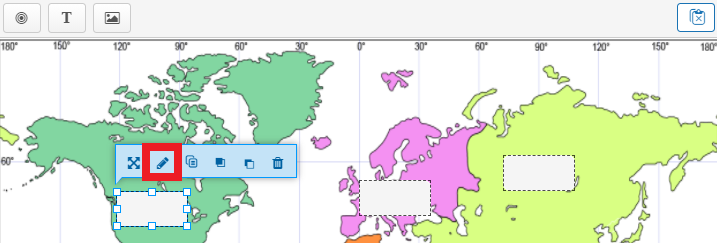
d. Drop zone-metin matching
i. Click on the relevant drop zone.
ii. Click on the “pencil” icon.
iii. Select the correct option under the "Select correct elements" field.
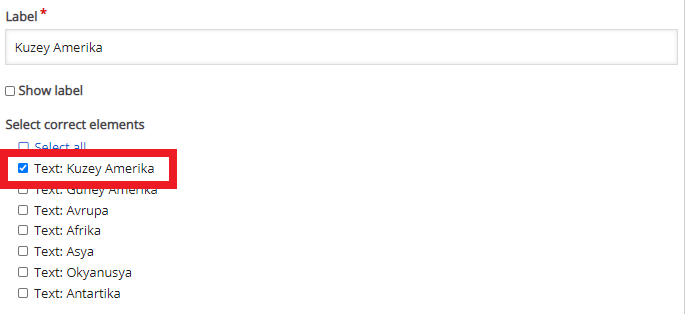
iv. Click on the "Done" button after completing the edits.
v. Do the same for each drop zone.
e. Click on the "Done" button after completing the edits.
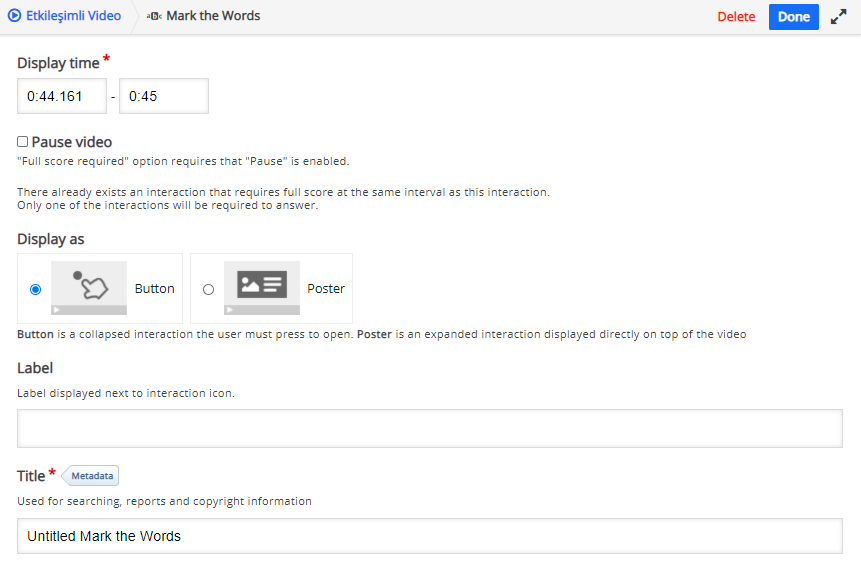
When you click on the "Mark the Words" button to add a mark th words question, a screen with a range of options will appear. In this question type, the student has to mark / choose the correct words in the sentence in line with the instructions you give.
- Firstly, let's get to know the view options.
a. Display time: Determine the time interval you want the question to appear on the screen and input the time period you specified here.
b. Pause video: It enables to pause the video when the question appears on the screen.
c. Display as: It enables the question to appear on the screen as a poster or button.
d. Label: Input text for the label. The label is the text that appears next to the interaction icon. When you click on the label, the question will show.
e. Title: Input a title for the question.
- Let's get to know the question options.
a. Explain how the student should solve the task in the "Task description" field.
b. Input a statement or question sentence in the "This is an answer: * answer *." field.
c. Correct words are marked with asterisks “*” just before and after the word. Only words can be marked as correct, not phrases.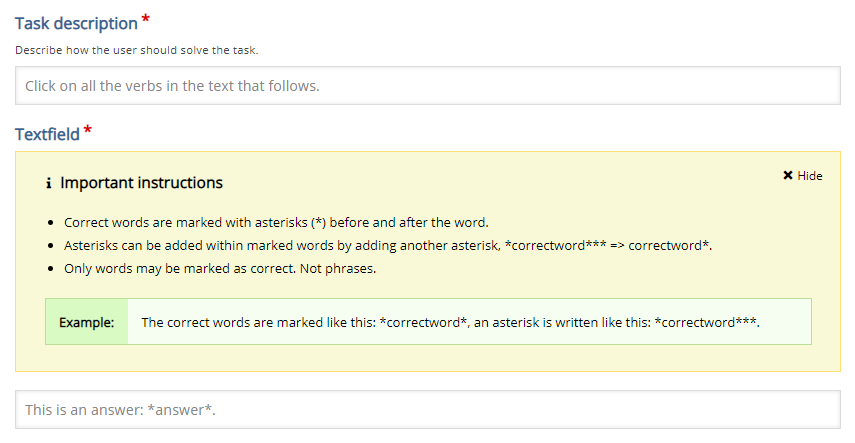
d. Click on the "Done" button after completing the edits.
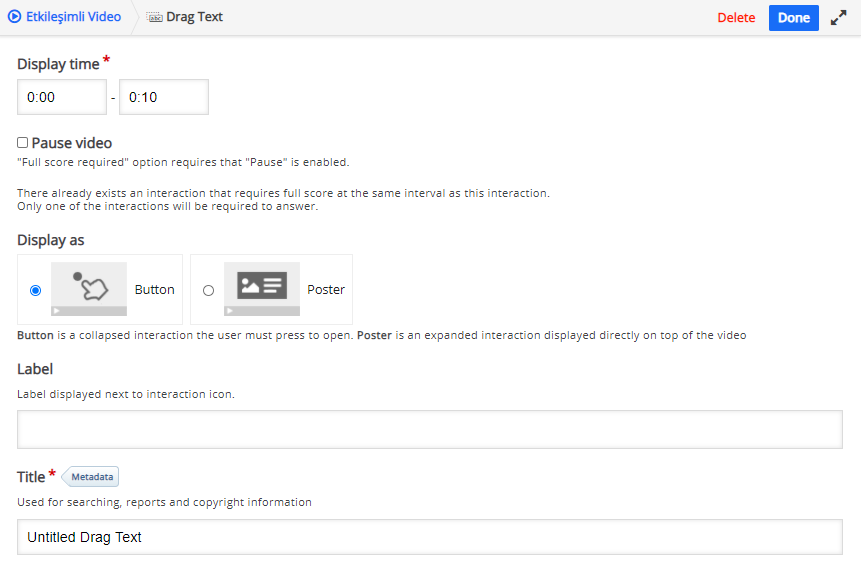
When you click on the "Drag Text" button to add a drag text question, a screen with a range of options will appear. Thus, the student will drag and drop the appropriate words into the blanks in the sentence.
- Firstly, let's get to know the view options.
a. Display time: Determine the time interval you want the question to appear on the screen and input the time period you specified here.
b. Pause video: It enables to pause the video when the question appears on the screen.
c. Display as: It enables the question to appear on the screen as a poster or button.
d. Label: Input text for the label. The label is the text that appears next to the interaction icon. When you click on the label, the question will show.
e. Title: Input a title for the question.
- Let's get to know the question options.
a. Explain how the student should solve the task in the "Task description" field.
b. Input the question sentence in the "Text" field.
c. Droppable words are added with an asterisk “*” just before and after the correct word/phrase.
d. You may add a textual tip, using a colon “:” just before the tip.
e. You may add feedback to be displayed when a task is completed. Use '+' for correct and '-' for incorrect feedback.

f. Click on the "Done" button after completing the edits.
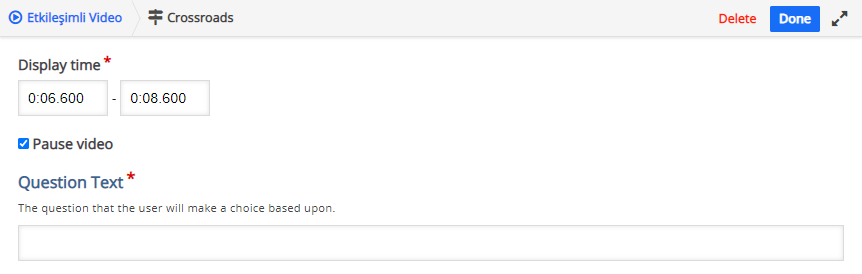
Crossroads are questions that allow you to direct students to a specific minute in the video. You can ask the students a question and direct them to a specific minute in the video based on their answers they choose from the options. When you click on the "Crossroads" button to add a crossroad question, a screen with a range of options will appear.
- Firstly, let's get to know the view options.
a. Display time: Determine the time interval you want the question to appear on the screen and input the time period you specified here.
b. Pause video: It enables to pause the video when the question appears on the screen.
c. Question Text: Input the question statement.
- Let's get to know the question options.
a. Choice Text: Input the first option.
b. Go To: When this option is clicked, specify the minute to direct in the video (e.g. 08:15).
c. If Chosen Text: An optional confirmation text that will be displayed after the user has pressed the choice button.
d. Click on the "Add Choice" button to add a new option.
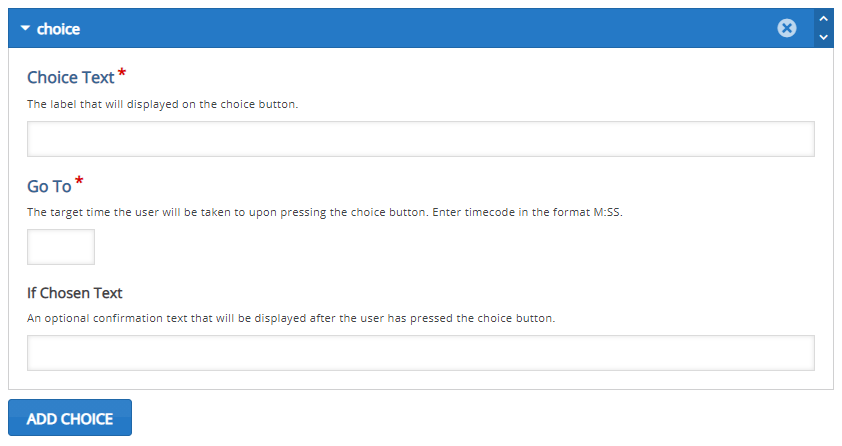
e. Click on the "Done" button after completing the edits
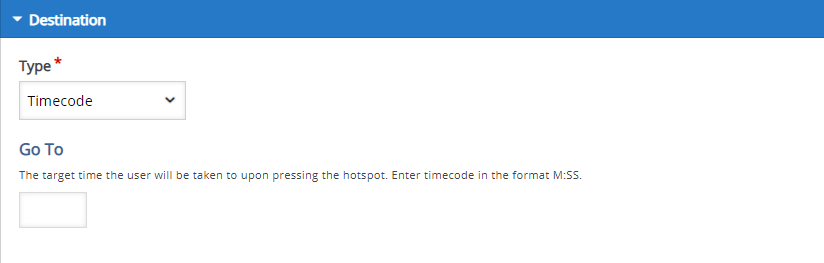
Hotspots enable you to create fields where the students can click to navigate to another part of the video or to another URL. Thus, you can ensure that the students reach the part in the video they are interested in or are directed to another web page.
When you click on the "Navigation Hotspot" button to add a navigation hotspot, a screen with a range of options will appear.
- Firstly, let's get to know the view options.
a. Display time: Determine the time interval you want the question to appear on the screen and input the time period you specified here.
b. Pause video: It enables to pause the video when the question appears on the screen.

- Let's get to know the hotspot options.
a. Type: If you want the student to go to a specific minute in the video by clicking on the hotspot you will create, select the "Timecode" option. If you want the student to go to another web page while in the video by clicking on the hotspot you will create, select the "Another Page (URL)" option.
b. Go To: When this option is clicked, specify the minute to direct in the video (e.g. 08:15).
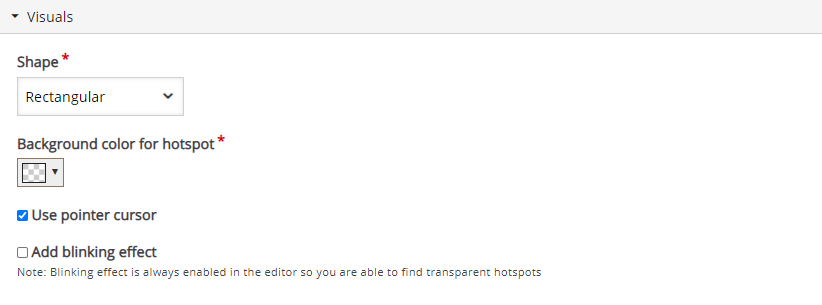
- Let's get to know the visual options.
a. Shape: You can choose the shape of the hotspot (rectangular, circular, rounded rectangle).
b. Background color for hotspot: You can change the color of the hotspot or make it transparent.
c. Use pointer cursor: It makes a hand sign when the mouse is over the hotspot. It is recommended to enable this option.
d. Add blinking effect: It adds a blinking effect to the hotspot.
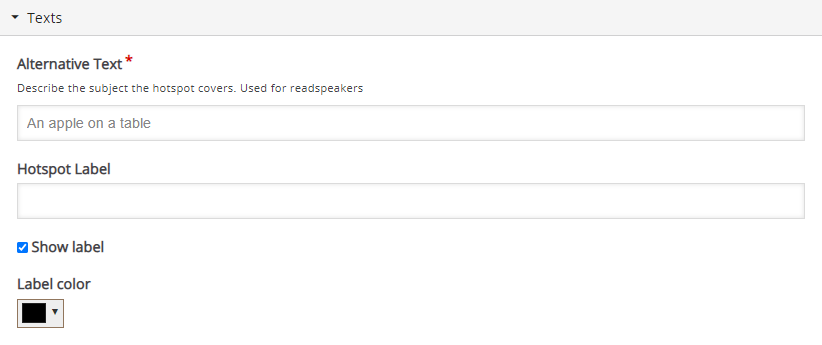
- Let's get to know the text options.
a. Alternative Text: Describe the subject the hotspot covers.
b. Hotspot Label: Input a label for the hotspot.
c. Show Label: If you want the tag you defined for the hotspot to appear in the video, activate this option.
d. Label Color: When the "Show Label" option is activated, this option is automatically added. Here you can change the font color of the label.
e. Click on the "Done" button after completing the edits.
f. When you add all the hotspots, an image will appear on the video as below.
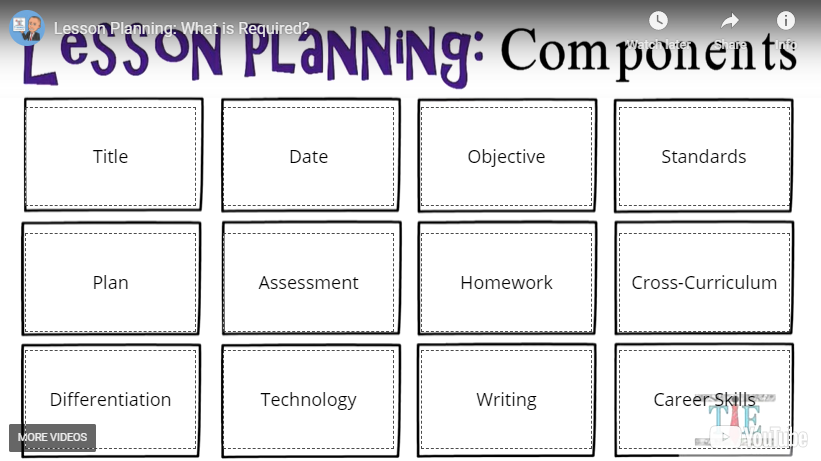
g. Therefore, the hotspots added on the video will be shown by the students and the students will be directed to the specific part in the video by clicking the relevant hotspot. For example, when the students click on the "Objective" field, they will be directed to the minute in the video where there is a narration about this title, and when they click on the "Homework" field, they will be directed to the minute with the narration about this title.
- Log in to post comments